In this post the worlds of AppSheet and Apps Script collide, the resulting fusion is a library which makes it easier to integrate external data and events into your AppSheet app. This solution hopefully makes it a lot easier for developers and low coders to do more with AppSheet creating the possibility to use one (or a couple) of lines of code to interact with your app and not worry which data source your app is using. This post has more details of how you can get started and an example of the impact its already making with an alternative Grab n Go Chromebook loaner solution I’ve been part of at CTS.
AppSheet is headlined as a no-code platform but this doesn’t mean for developers there aren’t coding opportunities. As part of AppSheet automations you can create and call webhooks as well as incorporating Google Apps Script functions. There might, however, be scenarios where you want to interact with your AppSheet app outside of automations, for example, responding to external events or incorporating custom data sources. The good news is, AppSheet has its own API to manage apps, which includes CRUD (create, read, update and delete) operations for tables and triggering actions.
In this post I’ll be sharing AppSheetApp, a Google Apps Script helper library we’ve made at CTS which makes it easy to use the AppSheet API in your own AppSheet apps. As part of this I’ll highlight how this library has made our AppSheet powered Grab n Go Chromebook loaner solution immediately scalable and data source agnostic.
Getting started
For this post I’m assuming you’ve got basic AppSheet/Apps Script knowledge. The AppSheetApp repo is on Github, which includes information on either adding AppSheetApp as a library or importing the code into your project. Once you’ve done this and setup API access within your AppSheet app in your Apps Script project you need to make a connection to your app by using:
const AppSheet = AppSheetApp.connect(‘YOUR_APP_ID’, ‘YOUR_ACCESS_KEY’);
Once connected you can use the documented methods for adding, deleting, reading and updating table records, and invoking certain action types. Below is a complete example which demonstrates how you can use AppSheetApp to add data to a table with the name ‘People’:
/**
 * Example function for adding rows to a Staff table using AppSheetApp
 */
function addRowsToStaffTable() {
  const AppSheet = AppSheetApp.connect('YOUR_APP_ID', 'YOUR_ACCESS_KEY');
  const rows = [
          {
              "FirstName": "Jan",
              "LastName": "Jones",
              "Age": 33,
              "Department": "Accounting",
          },
          {
              "FirstName": "Ian",
              "LastName": "Ivans",
              "Age": 22,
              "Department": "Payroll",
          }
      ];
      // Add rows to the 'Staff' table
      const resp = AppSheet.Add('People', rows);
      console.log(resp);
  }
For more detailed information about options for including user properties and the behaviour when adding row elements see the AppSheet API reference documentation.
Benefits of using the AppSheet API / AppSheetApp
Data agnostic
Before creating the AppSheetApp service when handling an external AppSheet app event more often than not, given I was using Google Sheets as a data source, I would either call the built-in SpreadsheetApp or Sheets Advanced Service. By using the AppSheet API with the AppSheetApp library I can now confidently write code and not have to worry about changes to the app data source. Should a different data source be used in an AppSheet app, we don’t have to change a single line of code as the AppSheet API handles the data interface for us.
Event driven
An issue you can have when updating AppSheet data sources outside of your app is there can be a delay in the data being reflected in your app. For example, if you are using Google Sheets as a data source and make changes using the Google Sheet APIs, AppSheet won’t necessarily pick up the change until the app is synced again. Updating data using the AppSheet API will mean AppSheet is aware if there is new data and can keep your app in sync. There are still API performance considerations and AppSheet provides guidance on how you can monitor this in the Performance Profiler.
Queryable
Another big advantage is that the AppSheet API makes it easy to query and selectively update table data. This is possible because a Selector property can be used to define an expression to select and format the rows returned. For example using AppSheetApp the following function can be used to return rows from a People table where the age is greater than or equal to 21:
/**
 * Return rows from a People table where age is greater or equal to 21
 * Run as user with the email an.example@email.com
 */
function findRowsInTable(){
  const AppSheet = AppSheetApp.connect('YOUR_APP_ID', 'YOUR_ACCESS_KEY');
  const properties = {
    "RunAsUserEmail": "an.example@email.com",
    "Selector": "Filter(People, [Age] >= 21)"
  }
  const resp = AppSheet.Find('People', [], properties);
  console.log(resp);
}
Grab n Go by CTS AppSheet solution
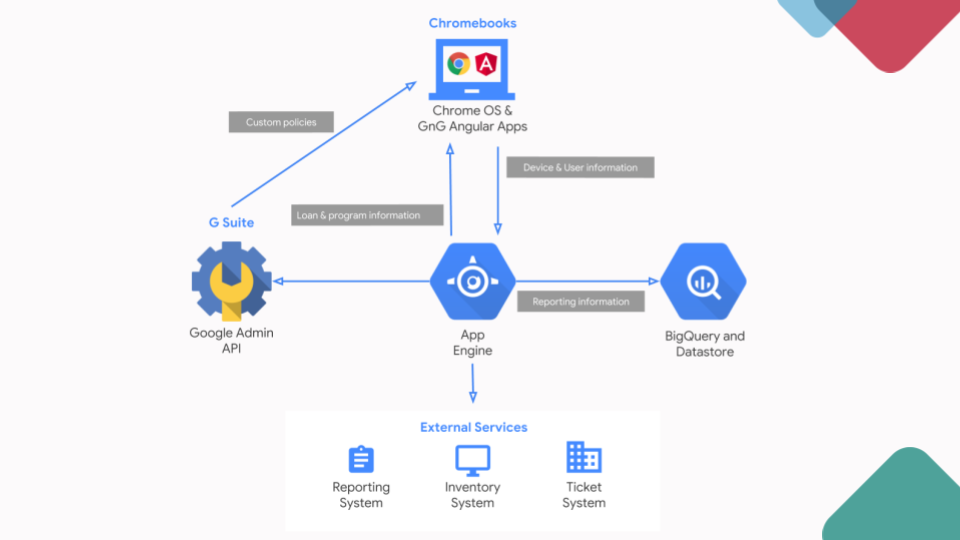
Let’s look at a real world example which illustrates the benefits of using the AppSheet API / AppSheetApp. For those not familiar with ‘Grab and Go’ the original solution made use of self-service stations that allow people to quickly borrow and return Chromebooks, streamlining the temporary allocation of ChromeOS devices. The solution was built with an Angular UI, sitting on App Engine with data stored in BigQuery and Datastore.

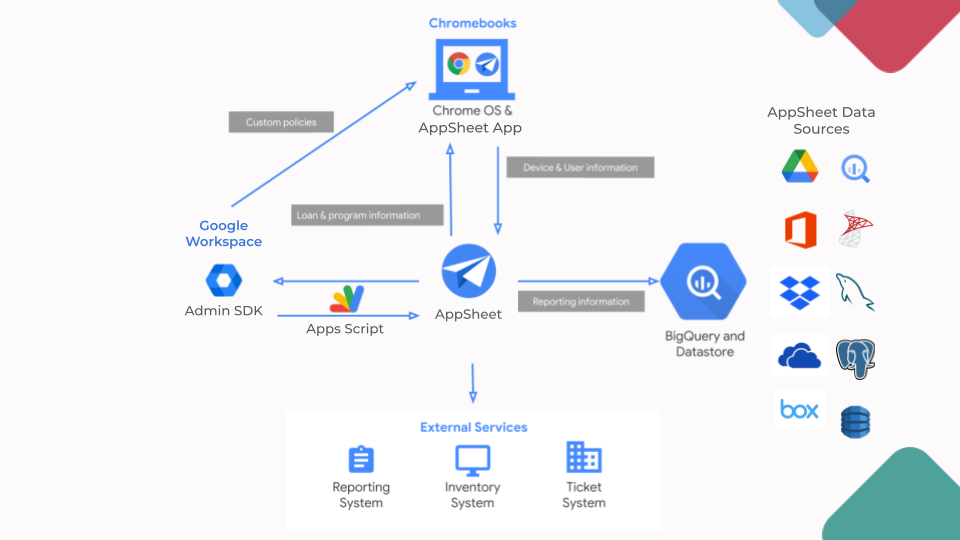
To create a more efficient solution that can be handed to our customers to easily modify and customise, we’ve adapted the original Grab n Go solution replacing App Engine with AppSheet. As part of this we are using Apps Script to respond to Chrome events via the Admin SDK updating the status in AppSheet.
Here is an excerpt of the Apps Script code which handles one of the ChromeOS events. As part of this it uses:
AppSheetApp.Find— to get additional information stored in AppSheet about the registered deviceAppSheetApp.Add— to record an event in an AppSheet event log tableAppSheetApp.Edit— to update the device information stored in the AppSheet app
device.response = AppSheet.Find(DEVICES, [{ deviceId: device.DIRECTORY_DEVICE_ID }]);
// log a device event
const eventRow = [{
  "deviceId": device.DIRECTORY_DEVICE_ID,
  "Actor": device.DEVICE_USER,
  "Action": device.EVENT_REASON,
  "DateTime": new Date(parseInt(device.TIMESTAMP))
}];
AppSheet.Add(EVENTS, eventRow);
const deviceRow = [];
// if it"s a managed device handle assign event
switch (device.EVENT_REASON) {
  case "CHROMEOS_AFFILIATED_USER_ADDED":
    // update the device information with added user
    const default_period = Utils.getStaticSetting("Default_Duration");
    const assigned_unix = parseInt(device.TIMESTAMP);
    const assigned_due_unix = assigned_unix + Utils.convertToSeconds(default_period) * 1000;
    deviceRow.push({
      "deviceId": device.DIRECTORY_DEVICE_ID,
      "Assigned": true,
      "Assigned to": device.DEVICE_USER,
      "Assigned Date": new Date(assigned_unix),
      "Assigned Due Date": new Date(assigned_due_unix),
      "Assigned Due Last Reminder": ""
    });
    AppSheet.Edit(DEVICES, deviceRow);
  default:
    console.error(`Event reason ${device.EVENT_REASON} not recognised: ${device.DIRECTORY_DEVICE_ID}`)
}
What this snippet hopefully highlights is how easy it is for us to combine external data/events with our AppSheet app combining find/edit/add in a couple of lines of code as well as giving us options down the line to change our AppSheet app data source.
Summary
For AppSheet users dabbling in Apps Script or vice versa hopefully you find the AppSheetApp library opens opportunities for you to do more. If you have any interesting use cases using this library or suggested improvements feel free to leave a comment here or in the AppSheetApp GitHub repo. If you are planning to be in/near London on the 25 April 2023 there is an opportunity to learn more about AppSheet, and the work we’ve been doing with Grab n Go at the Digital Transformation — power business outcomes with Google! event. Happy scripting!